
If you’re fumbling about trying to manage citations and references by hand (or using Microsoft Word’s terrible reference manager), please stop now. Here, we’ll show you how to use Mendeley Reference Manager to save a huge amount of time on referencing, while also ensuring it’s 100% correctly formatted, every time.
Let’s start by quickly addressing two important starting questions – namely, “What is Mendeley?” and “Why should you even use it?”.
Simply put, Mendeley is a fantastic free tool that makes the task of referencing a lot easier – and infinitely more accurate. Essentially, you load up the reference information into Mendeley just once, and then Mendeley makes sure that all of your in-text citations, as well as your reference list are perfectly formatted according to your university’s required referencing system – for example, APA, Harvard, etc.
In a nutshell, Mendeley takes care of the tiresome and error-prone task of managing and formatting citations and references, saving you loads of time and ensuring that it’s all done with 100% accuracy – which is near impossible if you try to do it manually. If you’re undertaking any sort of academic writing, you need to get comfy with Mendeley, pronto! This is especially true if you’re writing a longer-format piece such as a dissertation or thesis.
The first thing you’ll need to do is register a Mendeley account. This is free and takes just a minute to complete. You can register by visiting the Mendeley site here.
The next thing you’ll need to do is add the Mendeley Web Importer to your browser (for example, Chrome or Firefox). The web importer is a browser plugin that allows you to quickly add web-based resources to your Mendeley library. I’ll show you how to use this a little later in the video, but for now, you just need to add the web importer to your browser – you can access that here.
Last but certainly not least, you’ll need to get the Mendeley Cite plugin. This plugin is what connects Mendeley (or more specifically, all the reference data you’ll have in your Mendeley Library) with Microsoft Word, which you’ll use to write up your work. Again, this is a free plugin and you can access it here.
At this point, you might be thinking “Well, what about the desktop app?”. If you’d like to use the desktop application to manage your Mendeley library, you’re most welcome to, but we’ve found the web version to be just as good. The web version also ensures that all of your reference data are always perfectly synchronised on the cloud, so there’s no risk of synchronisation issues. All that said, there’s no problem if you want to use the desktop version – everything we cover here will still be relevant 🙂
Now that we have all the puzzle pieces in place, let’s look at the main interface, so that you can understand what each section does and how to get the most out of Mendeley.
The “home base” of Mendeley is what’s called the “Library”. You can access that here, or just click the “Library” button in the top right corner of the main Mendeley site. The Library area is where you will manage all of the reference data. On the left-hand side, you’ll see a selection of options. The first section is essentially a set of filters, providing different ways in which you can sift through your reference data. Most commonly, you’ll use the “All references” option, but you can also view recently added references, favourites and so on.

The next section is the collections section. Collections are essentially folders in which you can place related papers in whichever organisation system you like. For example, if your study involves analysing four key variables, you might have a collection for each variable. Or if you’re looking at an issue through different disciplinary lenses, you might have a collection for each lens.
Continuing down, the final section is the groups section. Groups allow you to share references and collaborate with up to 25 people. This is useful, for example, if you’re working on a group research project and want to share reference info between group members.

Moving to the top of the page, you’ll see a button labelled Notebook. The notebook is a space where you can jot down any general notes you want to make. These notes are called “Pages” in Mendeley, and it’s important to note that they’re not directly linked to any specific reference. Therefore, this is a useful place to add general thoughts that you can revisit later. If you do want to make notes that are specific to a resource, you can do that using a feature called “annotations”, which we’ll look at in the next section.
The first thing you’ll need to do is to add your actual reference data to Mendeley. This is the least exciting part for most students, but the good news is that Mendeley offers quite a few options in this regard.
Manually adding reference data is Mendeley is the slowest and most time-intensive route, but it’s useful to discuss it first so that you can see exactly what information Mendeley captures.
To add a resource manually, click the “Add new” button, followed by “Add entry manually”. As you can see, Mendeley then allows you to manually enter all the key information such as the author, date, title and so on. One thing to notice is that depending on the type of resource, the available fields within Mendeley will change. For example, if you select “Television broadcast”, the fields will be different from that of a journal article or a patent.

A useful thing to note here is that you can fast-track this process by using an “identifier”. For example, you can search for a DOI or Pubmed ID and it will auto-populate the info.

The second way to add reference data to Mendeley is to upload the PDF article. Naturally, this is only useful if you have a PDF copy of the resource, and if it is a journal article. For the most part, when you upload a journal article PDF, Mendeley will be able to auto-populate the fields, which will save you the time and effort of filling it in yourself (although it’s always a good idea to double-check this automated data).
The main benefit of using this method is that it means Mendeley will include a copy of the PDF within the Mendeley interface, which makes it easy for you to access the article whenever needed. This approach will also allow you to make highlighted annotations and notes within the article itself. Of course, I’ll show you how to do this in the next section.
The next way to add reference info to Mendeley is to use the Web Importer, which is the browser plugin we installed earlier. To use the Web Importer, simply visit the URL for any given resource (e.g., a news article, or a journal article within an academic database) and then click the Mendeley icon up in the top right. From there, you can easily add the resource to your library, or you can put it into a specific collection or group.
When using the Mendeley Web importer, it’s always a good idea to double-check the imported info, as this isn’t always perfect. You can do so by clicking the little pencil icon in the importer window, or by editing the information in the library at a later stage. This is particularly important when you’re using the web importer to add general webpages (i.e., non-academic resources), as there will often be some missing information that needs to be included.

The final option is to use Mendeley’s own search engine. Mendeley Search is similar to Google Scholar in terms of functionality, meaning that you can simply enter the name of the journal article that you want to add and then add it to your library with one click.
You can also use Mendeley Search to find relevant journal articles by entering a keyword. This is particularly useful for finding resources as Mendeley Search often allows you to get access to the full article in PDF format, which is great.

Last but not least, it’s worth noting that if you are currently using different reference management software and want to move over to Mendeley, that’s completely doable. Just click the “Add new” button, followed by “Import Library”. Mendeley allows you to import Bibtex, Endnote and RIS files, which you should be able to extract from most mainstream reference management packages.
Now that we’ve added our reference info to Mendeley, let’s talk about how you can manage your library effectively. Mendeley offers a few different options to help you organise and manage all of your resources.
Mendeley Favourites
You can mark any resource as a favourite by clicking the little star next to the author’s name. By doing this, you’ll be able to shortlist your favourites by selecting the “Favorites” option on the left menu. This functionality is pretty basic, but it can be useful if you want to quickly access a small group of key articles.

Mendeley Tags
The next option, which is a little more sophisticated, is tags. Essentially, you can create as many different tags as you like and then mark up any given resource with the relevant tag (or multiple tags). Once you’ve tagged your resources, you can use the “Filter” option in the top right corner to quickly view all the articles using the respective tag.

Mendeley Collections
Another bit of functionality to be aware of is collections. As we mentioned earlier, collections are much like folders, which means that you can use collections to group resources into certain themes, methodologies, variables, and so on.
To create a collection, just click the “New Collection” section and enter a name, and then you can just drag and drop the relevant resources into the collection. It’s worth pointing out that all of your resources will always be visible in the “All References” section, so don’t worry about not being able to remember which collection you dropped a resource into.

Mendeley Groups
Mendeley’s Groups functionality allows you to share reference information with your colleagues, which can be super useful for collaborative projects.
To make use of this, start by selecting “New Group”. From there, click the three-dot menu and select “Manage group” to add members to the group. To add references to the group, return to the “All references” section and drag and drop the relevant references into the group. Again, don’t worry about this action moving your references out of your library – any reference that you share with a group will still be accessible in your library.
Notes & Annotations
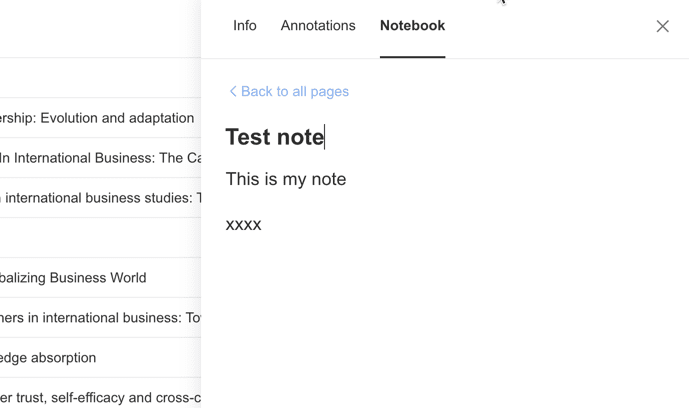
Last but not least, let’s look at the notebook function. The Mendeley’s Notebook area is a flexible space, where you can make general notes that are not specific to any given resource.
To create a note (or what Mendeleys refers to as a “page”), click the Notebook button, followed by “New Page”. Once you’ve created a note, it will “live” in your Mendeley library, but you can also export your notes as RTF files, which are text files that you can open using any Word processor. This is useful if you want to print your notes at some point or store them somewhere else.
Within the notes section, you’ll also notice an option called “Annotations”, which allows you to make notes about specific resources. This can be very useful for jotting down insights or key takeaways for each resource. To use annotations, just select the resource you want to make an annotation for, then click the “annotations” tab and enter your notes.

Now that we’ve looked at how to add and manage your reference data within Mendeley, it’s time to get to the most important part – using Mendeley within your actual Word document. In this tutorial, I’m using Microsoft’s online version of Word, but the layout and process will be much the same if you’re using the desktop version.
The first thing you’ll need to do is open the Mendeley Cite plugin within Word. You can find that over in the references tab (or sometimes the “add-ins” tab). Once you’ve done that, you’ll see that you have a mini-version of your Mendeley library within Word on the right-side bar.

Next, you’ll need to set the citation style for your document, for example, APA, MLA, etc. To do this, just click on the “Citation settings” tab, and then hit “Change citation style”. You can then select whichever style your university requires. If you don’t see the required style in this list, you can search for more styles by clicking the button titled “Search for another style” down at the bottom.

Once that’s all set, you can return to the “References” section within the Mendeley tab (i.e., the default section) and get to work adding citations to your document.
To add an in-text citation, simply place your cursor where you want the citation added, and then select the relevant resource by ticking it, after which you can hit the “Insert” button. If you want to add multiple references to a citation, simply tick the relevant resources and off you go.

To create a reference list (or what Mendeley refers to as a bibliography), all you need to do is head over to the section of your document where you want to place the list and then click the three-dot menu in the Mendeley plugin, followed by “Insert bibliography”. Mendeley then does all the hard work for you.
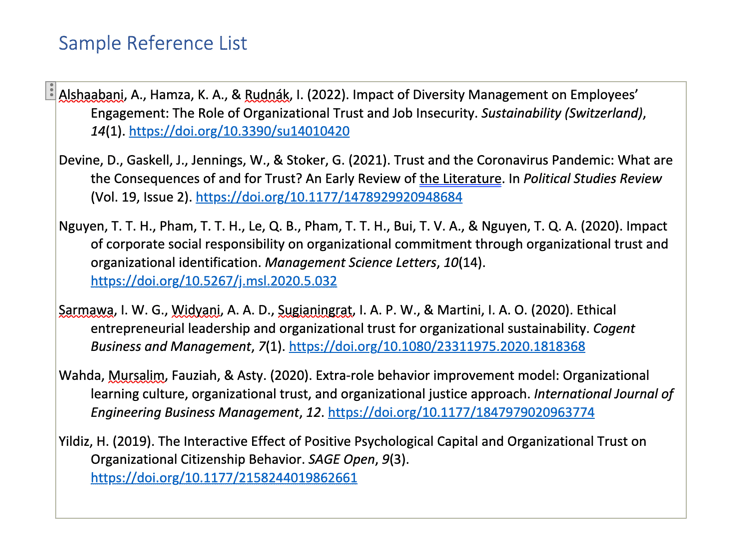
As you can see, Mendeley generates a complete reference list, based on the resources you’ve cited in your document. This list is perfectly formatted according to the style you specified earlier, which saves you a huge amount of time. As long as you’ve captured the reference information correctly when you added the resource to Mendeley, you can rest assured that this reference list is 100% accurate.
The only thing you may still need to do is set the line spacing, based on your university or department’s requirements. To do this, highlight your entire reference list and select the line spacing icon in Word’s formatting menu.
 spacing of the reference list." width="841" height="469" />
In this tutorial, we’ve covered the core functionality you need to know about to get the most out of Mendeley. If you have any questions, feel free to leave a comment.
Please keep in mind that while we try to help as much as we can, we cannot provide technical support for Mendeley. If something isn’t working the way it should be, please contact Mendeley support here.

This post was based on one of our popular Research Bootcamps. If you're working on a research project, you'll definitely want to check this out.